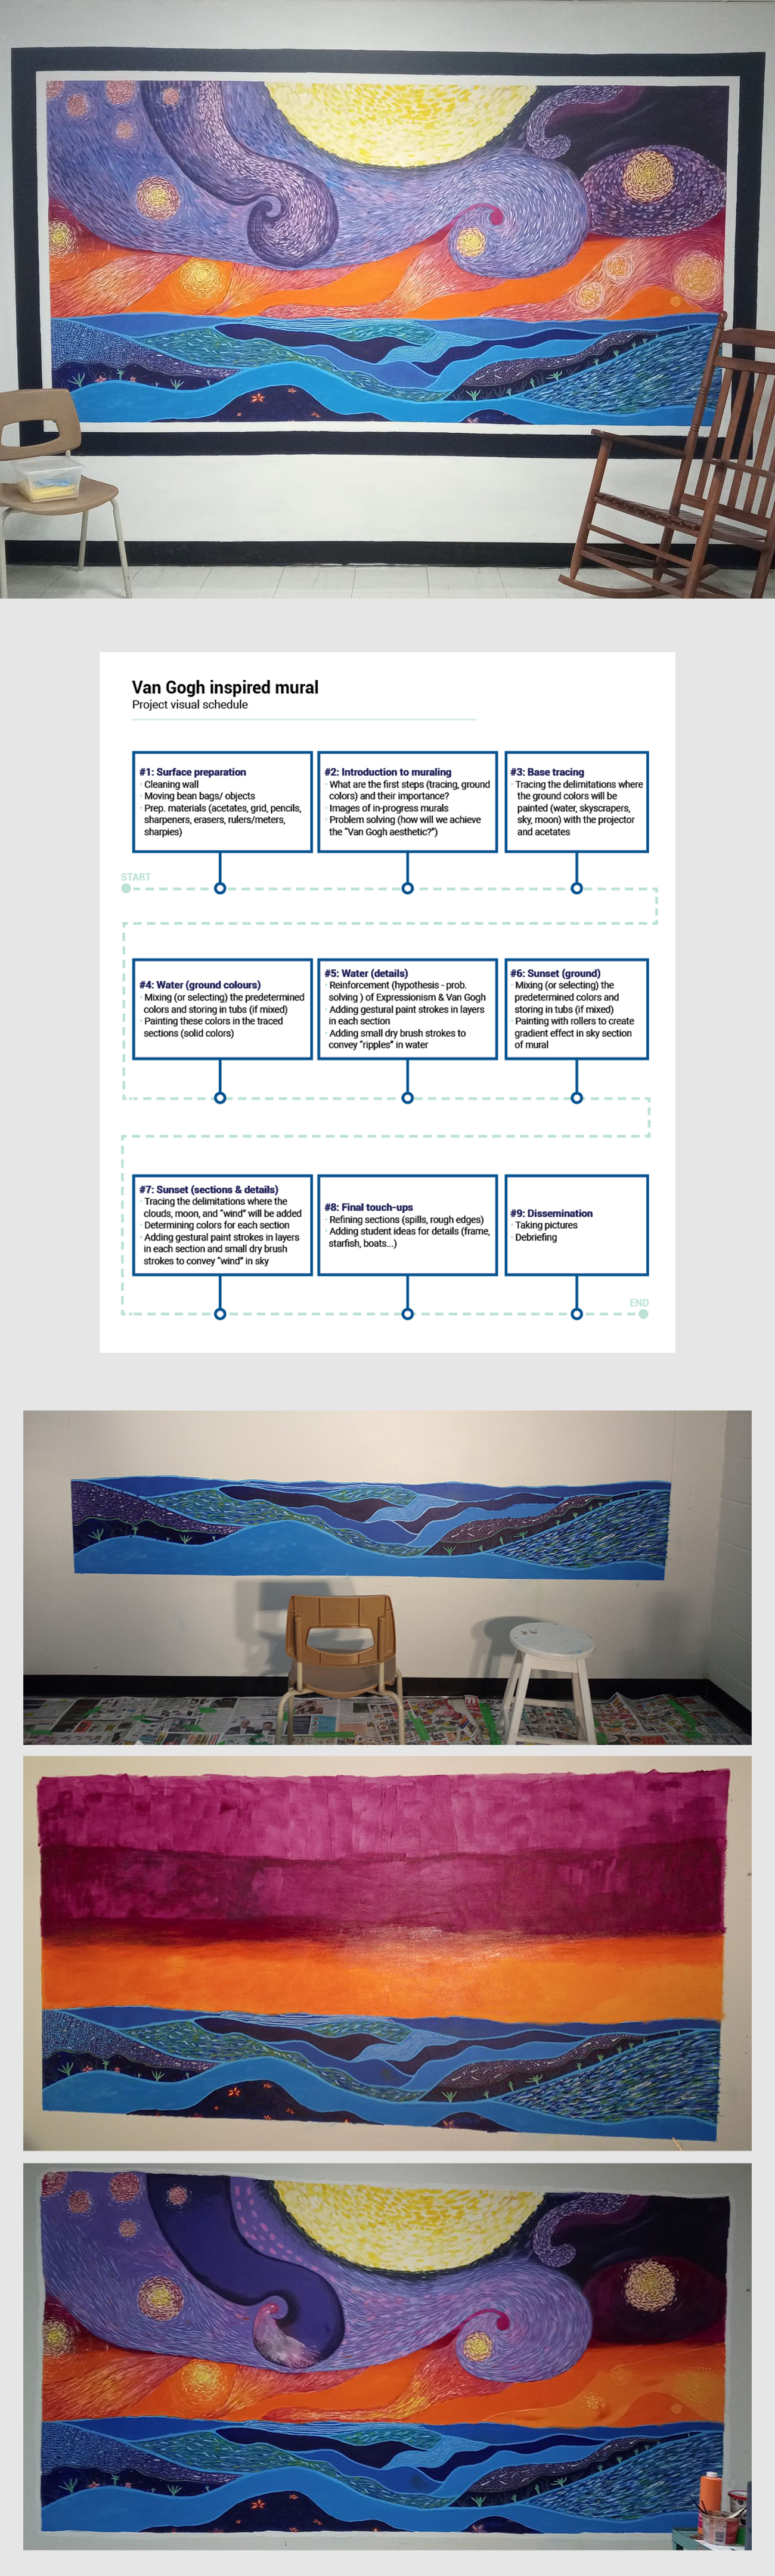
Students in the work oriented training path will be practicing their soft skills all whilst taking in consideration a client’s request (school principal) for a mural. They will receive daily tasks to complete. These will become less and less strict as the project goes on in order to help students develop effective work methods more independently.
Step 1: Introduction of impressionism and symbolism in art. Students explore the theme of a room in the school (the oasis, a room where they can relax or calm down during a crisis).
Step 2: Mixing of colors and tracing of the sketch on the wall with a projector. Preparation of the room (masking tape, tarps, and placing of tools and materials to be used) and distribution of student tasks.
Step 3: Painting of the background and delimitation of te areas to be painted.
Step 4: Painting gestural dry brush strokes to add texture in all the sections in Van Gogh's style.
Step 5: Adding details and embellishments, giving more freedom of creativity and choice to students (frame, starfish, seaweed...).
Step 6: Full clean-up of the room, final touch-ups, taking pictures, and official opening of the oasis.
This unit was designed to challenge DEFIS students’ preconceived ideas of what art looks like. What makes an artwork successful? What is beautiful about my own art and about my peers’ art? Does art have to look realistic in order to be considered beautiful?
Lesson 1: Introduction of abstraction and foundation line theory in art. Tracing of the mountains using curved lines and glueing of the yarn.
Lesson 2: Follow-up on abstraction in art and quick introduction of color theory. Students choose a color palette and practice 3 different types of brush strokes (vertical, circle, stippling).
Lesson 3: Follow-up on abstraction, different brush strokes, color theory, and introduction of texture. Students choose one or more new tools to add texture to their piece.
Lesson 4: Follow-up on all the previous concepts and introduction of patterns. Students choose at least one area in their mountains where they add a pattern.
Lesson 5: Reitaration of all concepts and techniques, final touch-ups, and relfection and appreciation of the created artwork using provided handouts.
1: Distinguish between curved and sharp line types when tracing and planning out their mountains in their composition.
2: Demonstrate independence in choice making when choosing their own colors, patterns, and textures.
3: Adopts effective and appropriate work methods by applying the learned painting and glueing methods from handouts into their final composition.
4: Select taught vocabulary when appreciating their own and their peers’ artworks.
Students in this group are used to following precise steps and coloring inside the lines. This intuitive project aims to slowly guide them out of their comfort zones and explore new, more intuitive art processes.
Lesson 1: Tracing of the overlapping geometric shaped sections.
Lesson 2: Painting thin washes of color in each section, overlapping the colors when sections meet, playing with transparency.
Lesson 3: Cutting the larger poster paper into four sections to further challenge the more rigid steps students are used to.
Lesson 4: Introduction of printmaking techniques using acetate transfers, stencils, and stamps.
Lesson 5: Application of the introduced printmaking techniques on the 4 small posters using more opaque paint layers.
Lesson 6: Final touch-ups, dissemination through appreciation, and installation of the artworks in the hallway.
1: Differentiate between 4 printmaking methods when practicing on the handouts and choosing which 2(+) methods to include in their series.
2: Adopts effective and appropriate work methods by applying the learned printmaking methods in their final posters and when creating overlays showing varied opacities
3: Selects taught vocabulary when appreciating their own and their peers’ artworks
What is an inequality or issue in the world that I would like to change? How can we share our ideas and create a piece of art that shows collectivity and that represents us as a group? Students create 4 prints on fabric inspired by these prompts.
Lesson 1: Students engage in brainstorming processes. How does creating in a group differ from creating individually? What do I want to change in the world? They get inspired by other students' contributions when completing the handouts.
Lesson 2: Students choose one of their sketches from the previous class and create a stencil.
Lesson 3-4: Choice of fabrics and colors of paint. Preparation of the fabric squares and printing of the images.
Lesson 5: Digital mapping of the banner. Students get in groups and create mockups of the future banner with the collected pictures of each student.
Lesson 6: There will be a vote on which mockup will be used as a guide. Then will follow the sewing of the banner (some by hand, some using sewing machines).
1: develop an independence and ownership over creative thought processes and artmaking when using the checklist handouts.
2: examine own and classmates’ contributions in the brainstorming sessions and collaborative processes.
3: synthesize and demonstrate an ability to perform the processes (brainstorming, sketching, stencilling, digitizing, and sewing) to create the banner.
4: Share ideas through the use of handouts, verbalizations, and art appreciations (of their classmates, their own, and of artists’ works).
I designed this unit to fit Hampstead’s theme of Fall. How can Fall be made exciting and unpredictable? How can I assess students’ abilities and limit fear of performance? Students learn about line types, warm and cold colors, and ephemeral art processes in the making of their leaves.
Lesson 1: Introduction of line types through the reading of an illustrated story and completion of handouts.
Lesson 2: Introduction of cold and warm colors. Creation of a personalized color guide to categorize colors.
Lesson 3: Reading of an illustrated story about Tom Thomson to introduce his Fall colored paintings and to motivate students to create an artwork inspired by him. Tracing of the leaves on the coffee filters.
Lesson 4: Filling in the leaves with different line types. One leaf is warm colored, the other cold colored. Students use their guides to remember which colors to use.
Lesson 5: Soaking of the leaves, drying, and cutting. Students participate in hanging up the leaves around the classroom.
1: Identify line types when completing a line exploration handout.
2: Identify and apply warm and cold colors when creating personal color guides and referring to them in their final project.
3: Selects taught vocabulary when appreciating their peers’ and traditional artworks.
4: Adopts effective and appropriate work methods when following the project’s steps and participating during experimental and hypothesis making phases.
How can we create harmonious color palettes and compositions? How can we take multiple people’s creations and join them together in a cohesive collaborative piece? Students will make 6 tiles inspired by Portuguese azulejos.
Lesson 1: Introduction of Portuguese architecture and tiles. Analysis of the shapes used in them and brainstorming of which types of shapes we could use in our own tiles.
Lesson 2: Tracing and cutting of small shapes to trace repeatedly in the tiles.
Lesson 3: Tracing of the repated shapes, overlapped or juxtaposed. Choice of a color palette.
Lesson 4: Coloring of the shapes using the color palette. Colors should be harmonious.
Lesson 5: Creation of colored frames to match the tiles, dissemination and appreciation, plus collaboration in the display of the tiles.
1: Applies folding and cutting techniques when following the tile demonstration.
2: Recognizes repetition as a tool for creating harmony by creating tiles with repeated shapes and colors.
3: Demonstrates independence in their artmaking when organizing their workstation with the appropriate tracing and coloring tools
Designed to introduce digital processes to seniors, participants "travel" using Google maps' Street view, creating a postcard for a fictive travel souvenir. Who would they send this to? What doodles should they add specifically for the person they would send it to?
Lesson 1: Getting familiar with Google Maps and screen capture methods.
Lesson 2: Choosing the city visited, creating a narrative, and selecting the best capture to be printed.
Lesson 3: Decorating of the printed postcard (front and back) and writing of a short message.
Introducing foreground, middleground, and background to a group of participants with varied skills and goals in artmaking. In this lesson, they can focus on technical watercolor skills and/or on a more narrative side to art by choosing what to paint.
Lesson 1: Exploration of materials, techniques, and inspiration objects (magazines, poems and books, photographs brought by students)
Lesson 2: Creation of the three layered folded "brochure", drawing, and painting of the composition
How do artists include words and typography elements in their art? Participants will decide on the methods in which they will incorporate narrative elements in their zine. Will they write paragraphs, include a few key words, or let the images speak for themselves?
Lesson 1: Folding and cutting of the zine, exploration of inspiration materials, and creation of the illustrations and story in the zine.
With each page, a line type (zigzag, horizontal, etc.) is introduced to the students. Students are encouraged to mimic the line types with their hands and arms. Associating different visuals with the new vocabulary should help students memorize the new terms. Created for first grade students.
This story is used as a motivational and engaging tool with students. The protagonist in the story, Tom Thomson, is the introduced artist, and students must create an artwork (magical fall leaf) to help him advance in his journey.
I obtained my teacher certification (brevet) and diploma in art education in May 2021. I am qualified for and have taught in primary and secondary schools. I have experience teaching special needs students as well as senior populations. Have a look at my complete teaching portfolio below!